Dealing with electrical problems at home can be intimidating, but many common issues can be safely fixed with some basic knowledge and a few tools. Electrical problems like tripped circuit breakers, loose outlets, faulty light switches, and overloaded circuits can disrupt your daily life and pose safety hazards if not addressed promptly. Knowing how to identify and fix these problems can save you time, money, and the inconvenience of calling a professional for minor issues.
Before attempting any electrical work, safety should always be your top priority. Always turn off the power at the main circuit breaker before starting any repairs to avoid the risk of electric shock. Use insulated tools, wear rubber-soled shoes, and work in a dry environment to further ensure your safety. Understanding the basic components of your home’s electrical system can help you troubleshoot and fix common problems more effectively.
In this article, we’ll guide you through the steps to fix some of the most common electrical issues you might encounter at home. We’ll cover how to identify and reset tripped circuit breakers, fix loose electrical outlets, replace faulty light switches, and safely address overloaded circuits. With these tips, you can tackle everyday electrical problems safely and efficiently.
Identifying and Resetting Tripped Circuit Breakers
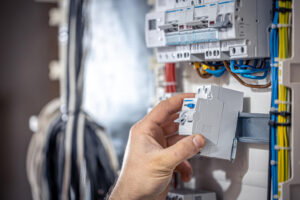
One of the most common electrical problems in homes is a tripped circuit breaker. A circuit breaker trips when it detects an overload or short circuit, cutting off the electrical flow to prevent damage and ensure safety. Identifying a tripped circuit breaker is usually straightforward. First, go to your electrical panel, which is often located in the basement, garage, or utility room. Look for a breaker that is in the “off” position or one that stands out from the others, as it may be slightly misaligned.
To reset a tripped circuit breaker, follow these steps:
1. Turn Off All Connected Devices: Before resetting the breaker, turn off or unplug all devices connected to the tripped circuit to avoid another trip.
2. Locate the Tripped Breaker: Find the breaker that is out of alignment or in the “off” position.
3. Flip the Breaker Off, Then On: Push the breaker fully to the “off” position and then back to the “on” position. You should hear a click as it resets.
If the breaker trips again immediately, there may be a more serious issue at hand, such as a short circuit or ground fault. In such cases, it’s best to call a professional for further inspection to ensure there are no underlying problems that could pose a safety risk.
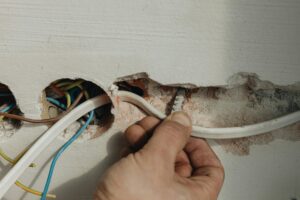
Fixing Loose Electrical Outlets
Loose electrical outlets are another common issue that can be both annoying and dangerous. A loose outlet can create a fire hazard due to poor contact between the plug and the outlet. Over time, this poor contact can cause arcing, which produces heat and can ignite surrounding materials. Fixing a loose outlet is a simple task that requires minimal tools.
Here’s how to fix a loose electrical outlet:
1. Turn Off Power: Always start by turning off the power to the outlet at the main circuit breaker to ensure your safety.
2. Remove the Outlet Cover: Use a screwdriver to remove the screws holding the outlet cover in place, and then remove the cover.
3. Tighten the Screws: Check the mounting screws that hold the outlet in place. If they are loose, tighten them with a screwdriver. Sometimes, the electrical box itself may be loose. In that case, gently tighten the screws that secure the box to the wall.
4. Add Shims if Necessary: If the outlet is still loose, you can use outlet shims or small washers to fill any gaps between the outlet and the electrical box, ensuring a snug fit.
5. Replace the Outlet Cover: Once everything is secure, replace the outlet cover and turn the power back on.
Fixing loose outlets not only improves safety but also makes it easier to plug in devices without the outlet moving. Following these simple steps can help you address this common issue quickly and effectively.
Replacing Faulty Light Switches
A faulty light switch can be frustrating and may pose a safety risk. Common symptoms of a faulty switch include flickering lights, the switch feeling warm to the touch, or a buzzing sound when you turn it on. If you experience any of these issues, replacing the light switch is a good idea.
Here’s how to replace a faulty light switch safely:
1. Turn Off Power: Turn off the power to the switch at the main circuit breaker.
2. Remove the Switch Plate: Use a screwdriver to take off the cover plate. Then, unscrew the mounting screws that hold the switch in place.
3. Inspect Wiring: Carefully pull the switch out of the electrical box and inspect the wiring. Note where each wire is connected so you can attach them to the new switch in the same way.
4. Remove the Old Switch: Disconnect the wires from the old switch. You may need a screwdriver to loosen the screws or pliers to pull the wires off.
5. Install the New Switch: Connect the wires to the new switch, following the same configuration as the old one. Tighten the screws to secure the wires.
6. Reattach the Switch and Cover Plate: Place the new switch into the electrical box, screw it in place, and reattach the cover plate.
7. Restore Power: Turn the power back on at the circuit breaker and test the new switch to ensure it works correctly.
Replacing a faulty light switch is a straightforward process that improves safety and restores proper function to your lighting system. Always remember to follow safety precautions when working with electricity.
Safely Addressing Overloaded Circuits
An overloaded circuit occurs when too many electrical devices are connected to a single circuit, exceeding its capacity. This can trip the circuit breaker or even cause electrical fires. Recognizing and addressing overloaded circuits is essential for home safety.
To safely address an overloaded circuit, follow these steps:
1. Identify the Overloaded Circuit: Pay attention to which circuit breaker trips frequently. This indicates that the connected circuit is likely overloaded.
2. List Connected Devices: Make a list of all devices connected to the problematic circuit.
3. Redistribute Electrical Load: Unplug some devices and distribute them across other circuits if possible. Avoid using extension cords as a long-term solution.
4. Upgrade Your Electrical System: If redistributing the load doesn’t solve the problem, consider upgrading your electrical system. This may involve adding more circuits or upgrading your breaker panel to handle a higher load.
5. Install Dedicated Circuits: For high-energy appliances like HVAC systems or electric dryers, installing dedicated circuits can prevent overloading and ensure safe operation.
Addressing overloaded circuits ensures that your electrical system operates safely and efficiently. By managing the electrical load, you can prevent frequent tripping and reduce the risk of electrical fires.
Final Thoughts
Understanding how to fix common electrical problems safely can empower you to maintain a safe and functional home. Whether you’re resetting tripped circuit breakers, fixing loose electrical outlets, replacing faulty light switches, or addressing overloaded circuits, proper knowledge and precautions are key. Following these guidelines can keep you and your family safe from potential electrical hazards.
While many electrical issues can be fixed with basic tools and a careful approach, some problems require professional expertise. When in doubt, it’s always best to consult a qualified electrician to ensure the safety and reliability of your electrical system.
For those who are more comfortable seeking professional help or have more complex electrical needs, don’t hesitate to reach out. Contact Turner On Services for expert electrical repair and services. Our team is ready to assist you with all your electrical needs and ensure your home remains safe and efficient.